
From today, the official LocknAlert integration is available on HACS — the Home Assistant Community Store. If you have a LocknAlert Bridge and a Paradox alarm panel, getting the two talking to Home Assistant is now just a matter of clicking through a few screens. No technical setup. No passwords to create. No confusing settings to find. Your bridge finds Home Assistant on its own, and everything is configured for you automatically.
This article explains what HACS is, what the installation looks like, and what you get once it is done.
What Is HACS?
Think of HACS as an app store for Home Assistant add-ons. It gives you a searchable list of extra integrations that the community has built — things your alarm brand, your smart plugs, or your local devices that are not yet in the official Home Assistant release. You find what you need, click install, restart Home Assistant, and it shows up under your devices. No files to copy manually, no technical steps.
There are two ways something can appear in HACS. Some integrations are listed directly in the main HACS search — you find them immediately by name. Others (like LocknAlert right now) need you to paste in a link first before you can install them. We will walk through exactly how that works below. We have applied to be in the main search, and we will update this post once that is approved.
What Happens When You Set It Up
Once the LocknAlert integration is installed, here is what it does for you automatically:
Your Bridge Finds Itself
When your LocknAlert Bridge is plugged in and on the same network as Home Assistant, it announces itself — the same way a wireless printer shows up on your computer without you doing anything. Home Assistant sees it and shows a notification saying your bridge has been found. You never need to know its IP address or dig through your router settings. It just appears.
No Passwords to Set Up
Getting devices to talk to each other over a local network used to mean creating usernames and passwords in the background, then entering them in multiple places. One typo and nothing worked. That whole step is now handled automatically behind the scenes. You click Configure on your discovered bridge, and the integration sorts out all the connection details without you seeing or typing any of them.
Instant Updates
The moment something happens on your alarm — a door opens, you arm it, the alarm triggers — Home Assistant knows immediately. There is no delay, no waiting for it to check in. Everything runs inside your home. Nothing goes through any external server or cloud service. Your alarm data stays on your own network.
What You See in Home Assistant
Once set up, your Paradox alarm shows up in Home Assistant as a proper alarm panel. You can see its current state at a glance and control it directly. The states it shows are:
- Disarmed — alarm is off
- Armed Away — fully armed, you have left
- Armed Home — perimeter armed, interior sensors off (Stay mode)
- Armed Night — perimeter armed, night mode
- Arming — counting down the exit delay
- Pending — counting down the entry delay
- Triggered — alarm is sounding
From there you can use it in any Home Assistant automation — arm when everyone leaves, disarm when you get home, get a notification when a zone opens. It also works with any voice assistant you have connected, like Google Home or Alexa.
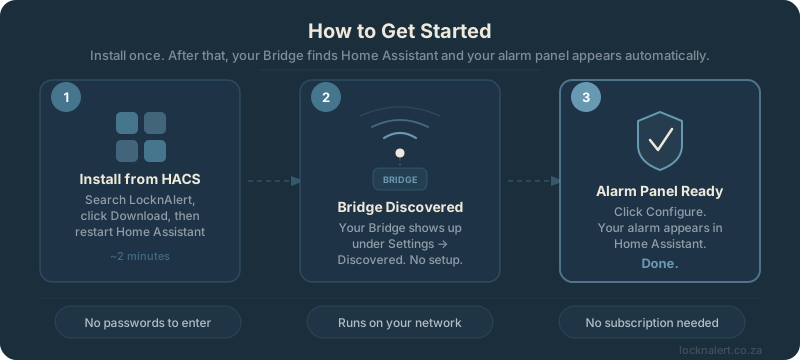
How to Install It
You will need HACS installed on your Home Assistant first. If you do not have it yet, the HACS setup guide walks you through it in about five minutes.
Once HACS is ready:
- Open HACS in your Home Assistant sidebar.
- Go to Integrations and click the three-dot menu in the top right.
- Select Custom repositories.
-
Paste in this URL and set the category to Integration:
https://github.com/LocknAlert-Pty-LTD/locknalert_mqtt
- Search for LocknAlert in HACS and click Download.
- Restart Home Assistant.
After the restart, go to Settings → Devices & services. If your bridge is on the same network, it will appear under Discovered automatically. Click Configure, confirm the serial number printed on your bridge, and you are done.
If it does not appear automatically, you can add it manually: go to Settings → Devices & services → Add integration, search for LocknAlert, and type in your bridge's IP address.
Why It Is Not in the Main HACS Search Yet
Right now you need to paste in a link to add it. We have applied to be listed in the main HACS catalogue, which would mean anyone searching "LocknAlert" in HACS finds it straight away. The HACS team reviews every integration for quality and security before listing it — a process that takes a few weeks. We are in that queue and will update this post the moment it is approved.
The extra step of pasting in the link takes about thirty seconds. Everything else works exactly the same as it will once we are in the main catalogue.
Why This Matters
Setting up the connection between your LocknAlert Bridge and Home Assistant used to involve quite a bit of fiddly technical configuration. That is now gone. Your bridge finds Home Assistant. The connection is handled automatically. Your alarm panel appears in your dashboard. You skip straight to the part where you actually do something useful with it.
That is what local home automation is supposed to feel like — not complicated because it is powerful, but simple because it was built to work that way from the start.
Ready to Connect Your Paradox Alarm to Home Assistant?
LocknAlert Bridge is the hardware that makes this possible. One purchase, no ongoing subscription, works on your local network forever.